To post on our site, our authors must read and agree to the following guidelines:
- Our site’s focus is helping project managers, especially those pursuing a PMP certificate, be successful. As such, we ask that our authors tailor their articles toward that demographic;
- We prefer our authors/working professionals to have practical and direct PM experience — the more the better. This makes it easier to relate to PMs and also to have a good source of anecdotal stories to write about (makes for interesting reading);
- The material on our site is subject to a creative commons license in that anyone can leverage or reproduce it as long as credit is given to the author; http://creativecommons.org/licenses/by-nc/3.0/us/
- The usual commitment is for one week of at least three posts, but we do accept single posts for one of our occasional ‘multi-author’ weeks;
- Each post should be 800-1000 words and include at least one image for visual appeal;
- You can mention your own business or website in your blog and bio, but, please, no ‘sales’ pitches;
- We prefer our authors to handle the various aspects of entering, editing and publishing on their own in our WordPress environment as this gives you more direct control over your formatting, and it saves me time.
Here are instructions on how to post on our WordPress-based site:
Updating your profile:
- Go to https://www.pmoleaders.com/wp-admin
- Enter your username and password
- Click Profile on the left side
- Check over fields for your Website, email address, and bio and update as necessary (Note: the bio will display publicly with all posts)
- If you are a new user and just received your login info via email, please change your password
- Save all changes
- To get your image to appear in your posts and on your author page, sign up for a free account at gravatar.com using the email address in your profile from step #6
You can view a graphical quick-reference guide here: https://www.pmoleaders.com/adding-a-post
Writing a post
- Click Add New on the left side under the Posts section
- Populate the Title and post Body
- Include at least one image (see How to add an image below); be sure to add at least one image by uploading to the gallery. This will put the image on the home page as well.
- Add Tags and at least one Category
- You can Save Draft (to save your progress), Submit for Review (if you are new to the site and not yet a full ‘Author’) or Publish. If you are writing for a future date, and you have Author privileges, be sure to edit the publish date before Scheduling it to post.
How to add an image
We like to have at least one appropriate image associated with each post. Be absolutely sure you have permission from the owner to post online any images you use. On Flickr.com, filter for Creative Commons licensed images to find images that are royalty or license free:
- Go to http://www.flickr.com/search/?q=&l=comm&ct=0
- Do a search and click on a good photo
- Right-click the image and save it to your computer (note the “by xxx” in the top-right corner)
- In the blog editor, click the “add image” button in the top-left
- Select the image file you just saved in step 4 and in the caption field, add “via Flickr by xxx” from #3

The Editor
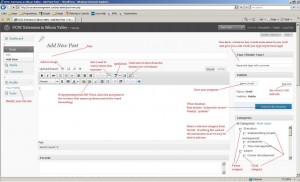
The image below points out important pieces of the blogger interface. Click on the image to expand (drawing courtesy Josh Nankivel).
PMI of Silicon Valley Logo
If you are a member of the PMI-SV (Silicon Valley Chapter of the Project Management Institute) , you can enable their logo to appear next to your name in your posts and author page by changing your nickname to ‘pmisv’. Here are instructions:
- Go to the login page here: https://www.pmoleaders.com/login and click on the image of the key
- Enter your credentials and click login
- Go to your profile page by clicking profile in the left bar
- In the nickname field, enter ’pmisv’ without quotes and no other characters
- Scroll down and click update profile
That is it. The logo should now show up for you.
Gravatar
Finally, our blog engine (WordPress) uses Gravatar.com as its source for author images. To have your head shot appear in our site, you will need to create an account at http://gravatar.com, upload your picture, and associate an email address that matches the one in your svprojectmanagement.com account. Your image will then appear in your bio page and at the bottom of each of your posts. If you want to use a different email address, you will need to update it in your svprojectmanagement.com account.
Feel free to email me with any questions, suggestions, corrections to these instructions.
– Loyal

